Arkalor's Bot (talk | contribs) No edit summary |
|||
| (12 intermediate revisions by 5 users not shown) | |||
| Line 1: | Line 1: | ||
{{Quest Summary |
{{Quest Summary |
||
| − | | |
+ | | Level = 180 |
| − | | |
+ | | Recommended Level = |
| − | | |
+ | | Quest Type = Solo |
| ⚫ | |||
| − | | |
||
| − | | |
+ | | Starts With = [[Roderick]] |
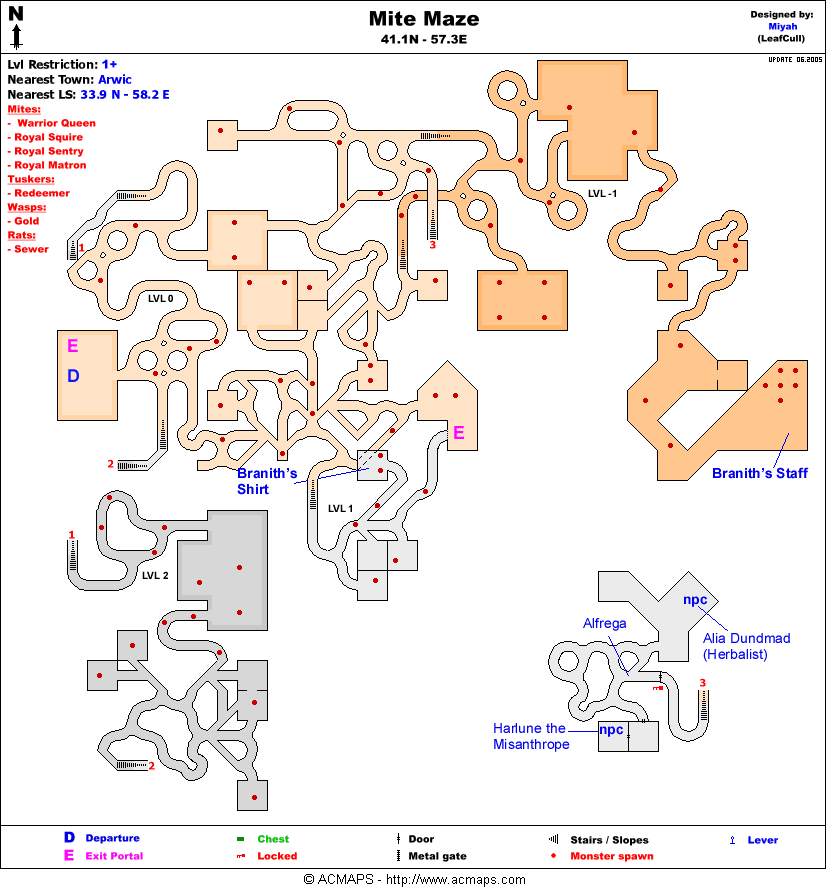
| + | | Starts At = [[Mite Maze]] at 41.1N, 57.3E |
||
| − | | Live Image Caption = The [[Falatacot Herald]] at the end of the [[Falatacot Visitor's Alcove]] |
||
| + | | Route = [[Facility Hub]] to Mite Maze portal in the west wing |
||
| − | | Quest Type = Solo/Group |
||
| − | | |
+ | | Repeat Timer = 20 Hours |
| − | | |
+ | | Time to Complete = |
| − | | |
+ | | Contracts = [[Contract for Harlune's Diplomacy]] |
| − | | Level Restrictions = 180+ |
||
| − | | Level Suggestions = 180+ |
||
| ⚫ | |||
| − | | Max XP Reward = 678,090,280(repeat) 1,017,135,420(first) |
||
| ⚫ | |||
| − | | |
||
| − | | Link Walk Through = True |
||
| ⚫ | |||
| − | | Link Items = True |
||
| − | | Link XP Rewards = True |
||
| − | | Link Title Rewards = False |
||
| − | | Link Images = False |
||
| − | | Link Lore & Dialog = True |
||
| − | | Link Notes = False |
||
}} |
}} |
||
| − | == |
+ | == Overview == |
| + | [[Harlune the Misanthrope]] has disappeared from the [[Mite Maze]] and the mysterious [[Roderick]] claims to be working on his behalf. He asks you to deliver a diplomatic message on his behalf to the Falatacot on Bur. |
||
| − | #Speak to [[Roderick]] in [[Mite Maze]], where [[Harlune the Misanthrope]] used to be (take the first right at [[Alfrega the Reedshark]], the room with the apple tree). He will give you the [[Diplomatic Message from Harlune]] (speak twice if you get [[A Crabbed Note]] at first). |
||
| − | #Use the Portal to Bur at 67.4N 30.5E. Stick left until you come to the portal to Kor-Gursha. |
||
| − | #Go East to the [[Collector Golem]] and keep going East from him to Scout Leader Tmauruk and the Guruk Kill task guys. Then take northern most East Tunnel From here. To the [[Southern Catacombs]]. |
||
| ⚫ | |||
| − | # The statue Roderick mentions is in the fourth room from the south in the east hallway on the right (east side of hallway running north to south). The statue will teleport you into the [[Falatacot Visitor's Alcove]]. |
||
| − | #In the first dungeon, head right at the T-junction. Use the second door you come across and follow through. Do '''NOT''' jump into any pits, you will not be able to get out. You go down once, then up twice. The second door going up, stop and clear the spawn if you can. |
||
| − | #Eventually reach a big, empty room. There is a floor lever just inside the room. Use this plate to spawn the statue and about 10 guards. After a few minutes you will receive a message that the statue's eyes have lit up and you can now use the statue to portal onto the next dungeon. You MUST hit that level to spawn the statue. Depending on where the guards spawn, you may be able to close the door and wait outside for the statue to charge up. If not, you can run around inside the room for a few minutes, dodging spells, until it is good. |
||
| − | #In the next dungeon go right and down at the junction and follow it through to the end. When you reach a door, behind that is the empty room and the statue. As you go in seven [[Blood Priestess]]es and an [[Elite Zharalim Agent]] will spawn -- retreat into the hallway and close the door until the statue charges, or run around the room dodging them. |
||
| − | *NOTE: The far wall behind the statues can be used to be avoided by the casters, and eventually even the melee types will get tired of you. If you die, you can run back quickly, and both statues might still be up. |
||
| ⚫ | |||
| − | * Note: It is not necessary to use the corpse of the Elite Zharalim Agent (a yellow dot, NPC corpse) to use the statue. |
||
| − | #Get to the end of the last dungeon and talk to the [[Falatacot Herald]]. He will take your Note...IMMEDIATELY run up and around the platform behind him! Several very tough monsters[[#footnote1|*]] will spawn. '''Tip:''' If you are an archer or mage, perch from the platform above the mob. Be careful the Laisu Sclavus casts Poison Health (20% lower health for 5 minutes) and there is no shortcut back. |
||
| − | * Your job is to kill the Blood Priestesses. One of them holds the Trinket you need to give to Roderick. The Blood Priestesses are IMPERIL VULNERABLE to COLD. If you can Imperil them, they go down to cold weapons incredibly fast. If you are a mage, Yield them (Magic def is over 500), and do the normal fire undead slayer beat down. |
||
| − | * If soloing: talk to the Herald and quickly jump up to the platform and wait, after a period of time the spawned creatures will ignore you allowing you to vuln and pull the Priestesses over one by one. |
||
| − | * If running multiple characters: Only 1 character in 3 needs to give the message. Pick the one with Lockpick, so he can easily get his next time. Note that if you talk to Roderick before giving him the trinket, he will replace your message, even if you gave it already (he's assuming you died). |
||
| − | **One of the Blood Priestesses will drop three [[Falatacot Blood Prophetess Trinket]]s that you must return to Roderick for XP and the title "Expendable". (If your fellowship is more than 3, the Herald respawns very quickly). |
||
| − | # Recall Last Portal. If you went to Bur right from Roderick, this brings you back to the Mite Maze. Head back up to Roderick for your reward. |
||
| ⚫ | |||
| + | ;Prerequisites |
||
| − | ---- |
||
| + | * You must be [[Asheron's Departure|Bur Flagged]] in order to complete this quest. |
||
| − | <span id="footnote1">* Giving the note to the herald spawns a [[Thralled Guruk Reaper]], [[Ancient Counselor]], [[Falatacot Consort]], [[Tortured Spirit]], [[Infused Blood Golem]], [[Laisu Sclavus]] and two [[Falatacot Blood Prophetess]]es.</span> |
||
| + | * Someone with [[Lockpick]] must open the doors in [[Mite Maze]] to access [[Roderick]]. |
||
| ⚫ | |||
| − | == |
+ | == Walkthrough & Notes == |
| + | === Part 1: Taking the Diplomatic Message to Bur === |
||
| ⚫ | |||
| + | #* Note: If you don't receive the diplomatic message the first time, speak with him again until you do. |
||
| + | # Go to [[Kor-Gursha]] on [[Bur]] and speak to [[Scout Leader Tmauruk]]. |
||
| + | #* Route: [[Rithwic]] to [[Glystaene Cottages]] portal at 8.8N, 60.9E. From there head to the [[Portal to Bur]] (must be flagged) at 67.4N, 30.5E. Alternatively, use the [[Bur Recall]] spell. |
||
| + | # Continue east to the [[Southern Catacombs]] portal. |
||
| ⚫ | |||
| + | # Use the statue inside the 4th room from the south in the back hallway (runs North and South) to enter the [[Falatacot Visitor's Alcove]] (see [[#Maps|map]]). |
||
| + | |||
| + | === Part 2: Falatacot Visitor's Alcove === |
||
| + | # From the drop, head South, and take your first Right. Use the ''second'' door you find, and move through the linear dungeon until you reach a large room. |
||
| + | #* Note: If you reach a pit, you have taken the wrong door. Do ''not'' jump into any pits, you will not be able to get out. |
||
| + | # Run straight ahead until you hit a floor plate, which triggers the spawn of a statue and about 10 undeads. |
||
| + | # Survive in the room until you receive a green message: |
||
| + | #* {{Tip}} Once you spawn the mob, retreat into the hallway and close the door until the statue charges. |
||
| + | # Use the statue to portal to the next stage. |
||
| + | # From the drop, take your first right, and follow the linear path, until once again, you reach a large room. |
||
| + | # Run straight ahead until you hit the floor plate, which will trigger the statue and a spawn of seven [[Blood Priestess]]es and an [[Elite Zharalim Agent]]. |
||
| + | # Survive in the room until you receive another message that the eyes light up and the statue can be used again. |
||
| + | #* {{Tip}} Once you spawn the mob, retreat into the hallway and close the door until the statue charges. |
||
| + | # Use the statue to be teleported into the next stage. |
||
| + | |||
| + | === Part 3: The Falatacot Herald === |
||
| + | # Take the door to the east and speak with the [[Falatacot Herald]]. He will take your Diplomatic Message from Harlune and spawn a mob of creatures [[#footnote1|*]]. |
||
| + | #* {{Tip}} Immeditely after speaking to the Falatacot Herald, run up to the platform behind him. Mages and archers can perch from here. |
||
| + | #* Note: Be careful the Laisu Sclavus casts Poison Health (20% lower health for 5 minutes) and there is no shortcut back. |
||
| + | # Kill the three [[Falatacot Blood Prophetess]]es, one of which will have a {{Itemlink|Falatacot Blood Prophetess Trinket}} on their corpse (drops 3). |
||
| + | #* {{Tip}} They are vulnerable to cold physcial attacks, and fire elemental attacks (undead slayer). |
||
| + | # Once you have a trinket, return to [[Mite Maze]] and give it to [[Roderick]] for your reward. |
||
| + | #* {{Tip}} If you talk to Roderick before handing in the trinket he will give you another Diplomatic Message. This will save you from having to make an extra trip to the Mite Maze the next time you do the quest. |
||
| ⚫ | |||
| + | |||
| + | == Dungeons & Maps == |
||
{{Dungeon Table |
{{Dungeon Table |
||
| Table Rows = |
| Table Rows = |
||
{{Dungeon Maps |
{{Dungeon Maps |
||
| Dungeon = Mite Maze |
| Dungeon = Mite Maze |
||
| − | | Coordinates = 41.1N 57.3E |
+ | | Coordinates = 41.1N, 57.3E |
| Wiki Map File = |
| Wiki Map File = |
||
| ACmaps ID = 01F8 |
| ACmaps ID = 01F8 |
||
| − | | Other Site Name = |
||
| − | | Other Site Link = |
||
}} |
}} |
||
{{Dungeon Maps |
{{Dungeon Maps |
||
| Dungeon = Kor-Gursha |
| Dungeon = Kor-Gursha |
||
| − | | Coordinates = |
+ | | Coordinates = N/A |
| − | | Wiki Map File = |
+ | | Wiki Map File = Kor-Gursha.jpg |
| − | | ACmaps ID = |
||
| − | | Other Site Name = |
||
| − | | Other Site Link = http://ac.warcry.com/content/game_info/bur_maps/kor_gursha Warcry |
||
}} |
}} |
||
{{Dungeon Maps |
{{Dungeon Maps |
||
| Dungeon = Southern Catacombs |
| Dungeon = Southern Catacombs |
||
| − | | Coordinates = |
+ | | Coordinates = N/A |
| − | | Wiki Map File = |
+ | | Wiki Map File = 00D4.jpg |
| − | | ACmaps ID = |
||
| − | | Other Site Name = |
||
| − | | Other Site Link = http://ac.warcry.com/media/images/maps/Southern%20Catacombs.jpg Warcry |
||
}} |
}} |
||
{{Dungeon Maps |
{{Dungeon Maps |
||
| Dungeon = Upper Catacombs |
| Dungeon = Upper Catacombs |
||
| − | | Coordinates = |
+ | | Coordinates = N/A |
| Wiki Map File = 00CE.gif |
| Wiki Map File = 00CE.gif |
||
| − | | ACmaps ID = |
||
| − | | Other Site Name = |
||
| − | | Other Site Link = |
||
}} |
}} |
||
{{Dungeon Maps |
{{Dungeon Maps |
||
| Dungeon = Falatacot Visitor's Alcove |
| Dungeon = Falatacot Visitor's Alcove |
||
| − | | Coordinates = |
+ | | Coordinates = N/A |
| Wiki Map File = |
| Wiki Map File = |
||
| − | | ACmaps ID = |
||
| − | | Other Site Name = |
||
| − | | Other Site Link = |
||
}} |
}} |
||
}} |
}} |
||
| − | == |
+ | == Rewards == |
| − | {{ |
+ | {{Rewards Table |
| ⚫ | |||
| − | |Caption=Quest Items |
||
| ⚫ | |||
| ⚫ | |||
| + | | Max XP Reward = 1,017,135,420 | Percent of Level = 30 | Level Cap = 275 |
||
| ⚫ | |||
| + | | Repeat Max XP Reward = 678,090,280 | Repeat Percent of Level = 20 | Repeat Level Cap = 275 |
||
| + | | Luminance Reward = 12,000 |
||
| ⚫ | |||
}} |
}} |
||
| − | == |
+ | == Images == |
| + | Click image for full size version. |
||
| − | {{Quest Experience Table |
||
| + | <gallery widths=200px heights=200px perrow=3> |
||
| − | | Repeat Differs = True |
||
| + | File:Roderick Live.jpg|Roderick |
||
| − | | Table Rows = |
||
| + | File:Falatacot Herald Live.jpg|Falatacot Herald |
||
| − | {{Quest Task |
||
| + | </gallery> |
||
| − | | Description = Give the [[Falatacot Blood Prophetess Trinket]] to [[Roderick]] |
||
| − | | Max XP = 1,017,135,420 |
||
| − | | Percent of Level = 30 |
||
| − | | Level Cap = 275 |
||
| − | | Repeat Max XP = 678,090,280 |
||
| − | | Repeat Percent of Level = 20 |
||
| − | | Repeat Level Cap = 275 |
||
| ⚫ | |||
| ⚫ | |||
| − | == |
+ | == Videos == |
| + | {| |
||
| − | {{Title Rewards Table |
||
| + | |[[File:Asheron's Call Harlune's Diplomacy Quest Guide]] |
||
| − | | Table Rows = |
||
| + | |} |
||
| − | {{Title |
||
| − | | Title = Expendable |
||
| ⚫ | |||
| ⚫ | |||
| ⚫ | |||
| − | {{Title |
||
| + | {{Dialog| |
||
| − | | Title = Hard to Kill |
||
| + | ;Opening Dialog |
||
| ⚫ | |||
| ⚫ | |||
| − | }} |
||
| ⚫ | |||
| − | }} |
||
| ⚫ | |||
| ⚫ | |||
| ⚫ | |||
| + | ;Giving Diplomatic Message from Harlunes to Falatacot Herald |
||
| ⚫ | |||
| ⚫ | |||
| − | <font color=darkgoldenrod>Town Crier tells you, "Rumor has it that Harlune has picked up and left the Mite Maze, though he still maintains a residence there. It might be worth finding out what's going on down there."<br></font> |
||
| ⚫ | |||
| ⚫ | |||
| ⚫ | |||
| ⚫ | |||
| ⚫ | |||
| − | <font color=darkgoldenrod>Town Crier tells you, "I've heard that Roderick, the bodyguard in the Mite Maze who's watching over Harlune's business, has some shady ties..."<br></font> |
||
| ⚫ | |||
| ⚫ | |||
| ⚫ | |||
| ⚫ | |||
| + | ;Giving Blood Prophetess Trinket to Roderick (2nd quest completion) |
||
| − | <font color=darkgoldenrod>Ulgrim the Unpleasant tells you, "You know, I really admire that Harlune fellow. I mean, he taught Celcynd everything he knows, right? And Celcynd spends all of his time in a bar drinking! Clearly, Harlune is wise."<br></font> |
||
| ⚫ | |||
| ⚫ | |||
| ⚫ | |||
| ⚫ | |||
| + | ;Other Interactions |
||
| − | ---- |
||
| ⚫ | |||
| ⚫ | |||
| ⚫ | |||
| ⚫ | |||
| ⚫ | |||
| ⚫ | |||
| ⚫ | |||
| ⚫ | |||
| − | <font color=darkgoldenrod>Roderick tells you, "Ya have the note - what are ya doin' here still? Go to Bur and find the way to deliver that note. Ya need to use a new statue to get in - it's in a place that us Isparians ain't never been to before now. Don't forget to bring back proof ya won."<br></font> |
||
| ⚫ | |||
| ⚫ | |||
| − | ---- |
||
| ⚫ | |||
| ⚫ | |||
| ⚫ | |||
| + | == Update History == |
||
| − | <font color=green>This is the statue that Roderick told you about. You activate it and are teleported away to the Falatacot Visitor's Alcove.</font><br> |
||
| + | {{Update History| |
||
| + | [[Dispatch]] |
||
| + | * Quest introduced. |
||
| + | [[The Quest for Freedom]] |
||
| − | ---- |
||
| + | * Repeat timer changed from 13 days to 20 hours. |
||
| − | |||
| ⚫ | |||
| ⚫ | |||
| − | |||
| ⚫ | |||
| − | |||
| ⚫ | |||
| ⚫ | |||
| − | |||
| − | ---- |
||
| − | |||
| ⚫ | |||
| ⚫ | |||
| ⚫ | |||
| − | |||
| − | ---- |
||
| − | |||
| ⚫ | |||
| ⚫ | |||
| ⚫ | |||
| ⚫ | |||
| ⚫ | |||
| − | |||
| − | |||
| − | ---- |
||
| − | |||
| − | <font color=darkgoldenrod>Falatacot Herald tells you, "Why do you bother me, human? If you have nothing for me, leave!"</font><br> |
||
| − | |||
| − | ---- |
||
| − | |||
| − | <font color=darkgoldenrod>Roderick tells you, "Ya lost the note? I got extra copies, but be careful with the thing! Bring me back proof ya won, when they attack."</font><br> |
||
| − | <font color=green>Roderick gives you Diplomatic Message from Harlune.</font><br> |
||
| − | |||
| − | <font color=darkgoldenrod>Roderick tells you, "Ya have the note -- what are ya doin' here still? Go to Bur and find the way to deliver that note. Ya need to use a new statue to get in - it's in a place that us Isparians ain't never been to before now. Don't forget to bring back proof ya won."</font><br> |
||
| − | |||
| − | ---- |
||
| − | |||
| ⚫ | |||
| ⚫ | |||
| ⚫ | |||
| ⚫ | |||
| − | |||
| − | ---- |
||
| − | |||
| − | <font color=green>You give Roderick Falatacot Blood Prophetess Trinket.</font><br> |
||
| ⚫ | |||
| ⚫ | |||
| ⚫ | |||
| − | [[Category:Quest]] |
||
| − | [[Category:Title Reward]] |
||
Revision as of 22:20, 4 February 2015
| Walkthrough & Notes Dungeons & Maps Rewards Images Dialog Update History |
| Harlune's Diplomacy | |
|---|---|
| Level: | 180 |
| Type: | Solo |
| Starts With: | Roderick |
| Starts At: | Mite Maze at 41.1N, 57.3E |
| Route: | Facility Hub to Mite Maze portal in the west wing |
| Repeat: | 20 Hours |
| Contracts: | Contract for Harlune's Diplomacy |
Overview
Harlune the Misanthrope has disappeared from the Mite Maze and the mysterious Roderick claims to be working on his behalf. He asks you to deliver a diplomatic message on his behalf to the Falatacot on Bur.
- Prerequisites
- You must be Bur Flagged in order to complete this quest.
- Someone with Lockpick must open the doors in Mite Maze to access Roderick.
- You must maintain the Diplomatic Message from Harlune in your inventory throughout the quest.
Walkthrough & Notes
Part 1: Taking the Diplomatic Message to Bur
- Roderick will give you Diplomatic Message from Harlune.
- Note: If you don't receive the diplomatic message the first time, speak with him again until you do.
- Go to Kor-Gursha on Bur and speak to Scout Leader Tmauruk.
- Route: Rithwic to Glystaene Cottages portal at 8.8N, 60.9E. From there head to the Portal to Bur (must be flagged) at 67.4N, 30.5E. Alternatively, use the Bur Recall spell.
- Continue east to the Southern Catacombs portal.
- Stick right past Guruk and use the Rock next to Temple of the Three, Ritual Chambers portal to enter the Upper Catacombs.
- Use the statue inside the 4th room from the south in the back hallway (runs North and South) to enter the Falatacot Visitor's Alcove (see map).
Part 2: Falatacot Visitor's Alcove
- From the drop, head South, and take your first Right. Use the second door you find, and move through the linear dungeon until you reach a large room.
- Note: If you reach a pit, you have taken the wrong door. Do not jump into any pits, you will not be able to get out.
- Run straight ahead until you hit a floor plate, which triggers the spawn of a statue and about 10 undeads.
- Survive in the room until you receive a green message:
- Tip: Once you spawn the mob, retreat into the hallway and close the door until the statue charges.
- Use the statue to portal to the next stage.
- From the drop, take your first right, and follow the linear path, until once again, you reach a large room.
- Run straight ahead until you hit the floor plate, which will trigger the statue and a spawn of seven Blood Priestesses and an Elite Zharalim Agent.
- Survive in the room until you receive another message that the eyes light up and the statue can be used again.
- Tip: Once you spawn the mob, retreat into the hallway and close the door until the statue charges.
- Use the statue to be teleported into the next stage.
Part 3: The Falatacot Herald
- Take the door to the east and speak with the Falatacot Herald. He will take your Diplomatic Message from Harlune and spawn a mob of creatures *.
- Tip: Immeditely after speaking to the Falatacot Herald, run up to the platform behind him. Mages and archers can perch from here.
- Note: Be careful the Laisu Sclavus casts Poison Health (20% lower health for 5 minutes) and there is no shortcut back.
- Kill the three Falatacot Blood Prophetesses, one of which will have a Falatacot Blood Prophetess Trinket on their corpse (drops 3).
- Tip: They are vulnerable to cold physcial attacks, and fire elemental attacks (undead slayer).
- Once you have a trinket, return to Mite Maze and give it to Roderick for your reward.
- Tip: If you talk to Roderick before handing in the trinket he will give you another Diplomatic Message. This will save you from having to make an extra trip to the Mite Maze the next time you do the quest.
- Note: If you speak to Roderick a 2nd time, he will give you a ride to Fort Tethana.
Dungeons & Maps
| Dungeon | Coordinates | Wiki Map | ACmaps |
|---|---|---|---|
| Mite Maze | 41.1N, 57.3E | -- | 01F8 |
| Kor-Gursha | N/A | -- | |
| Southern Catacombs | N/A | -- | |
| Upper Catacombs | N/A | -- | |
| Falatacot Visitor's Alcove | N/A | -- | -- |
Rewards
| Give Falatacot Blood Prophetess Trinket to Roderick | |
|---|---|
| Experience: | 1,017,135,420 (30% up to level 275) |
| Quest Repeat: | 678,090,280 (20% up to level 275) |
| Luminance: | 12,000 |
| Titles: | Expendable Hard to Kill (2nd completion) |
Images
Click image for full size version.
")
Roderick
")
Falatacot Herald
Videos

|
Dialog
- Opening Dialog
- Roderick tells you, "Hmm...Ya think ya might be interested in doin' a favor for Harlune? Ya look tough enough to survive what he has in mind."
- Roderick gives you Diplomatic Message from Harlune.
- Roderick tells you, "The Falatacot Matriarchs sent him a message, ya see, askin' if he'd like to ally. Well, of course he don't - the Falatacot can't be trusted one bit. So he wants to send a message back...but ya know how Harlune can be."
- Roderick tells you, "Anyways, he asked me to find some volunteers to deliver the mission. He didn't tell me to mention it, but I'll be nice and mention it anyways - the Falatacot ain't gonna be happy when they read the message."
- Roderick tells you, "Here, take this and bring it to Bur. One of the statues up there should lead to a new place where ya can go and deliver the message, and then ya better be ready for a fight. If ya win, bring something back to prove to me that ya won."
- Giving Diplomatic Message from Harlunes to Falatacot Herald
- You hand over all of your Diplomatic Message from Harlunes.
- The Falatacot Herald reads the message from Harlune. At first, his aged face is impassive, but as he continues reading a visage of sheer fury appears.
- Falatacot Herald says, "You would dare mock our offer so?! You would dare present me with such insults?! Do you see that corpse in the corner? That is from the last messenger we had to deal with, dispatched from that Dericost worm Rytheran!"
- Falatacot Hearlad says, "It is fortunate for you the Matriarchs themselves are indisposed - your deaths shall be quick, instead! Come, servants of the Blood, destroy these interlopers and drain their blood for our ends!"
- Falatacot Blood Prophetess says, "You would dare such insolence? Fear our wrath!"
- Giving Blood Prophetess Trinket to Roderick
- You give Roderick Falatacot Blood Prophetess Trinket.
- Roderick tells you, "So...ya survived, huh? Congratulations. To think I thought ya wouldn't make it..."
- You have been given the title "Expendable" by Roderick.
- You've earned 1,017,135,420 experience.
- Giving Blood Prophetess Trinket to Roderick (2nd quest completion)
- You give Roderick Falatacot Blood Prophetess Trinket.
- Roderick tells you, "Ya seem like a glutton for punishment. Still, I gotta admit - I'm impressed."
- You have been given the title "Hard to Kill" by Roderick.
- You've earned 678,090,280 experience.
- Other Interactions
- The statue looks as if it has been tampered with...its eyes are dull.
- The statue's eyes light up suddenly - it can be used again, you would surmise.
- The statue whispers in your head, "You bear a message for the matriarchs. You may pass."
- Falatacot Warden Statue teleports you with Welcomed by the Blood Witches
- Your lightning coruscates over Elite Zharalim Agent's mortal remains!
- You search the body again, but you find nothing new.
- The statue whispers in your head, "You bear a message for the matriarchs. You may pass."
Update History
|